

The "paneled spaceship" look is a staple of the Star Wars aesthetic. The filming miniatures are covered with sheets of styrene and the sets with 3/4 inch plywood. Within the Star Wars universe the Millennium Falcon is almost completely covered with "durasteel and duralloy" armor plating. I initially decided I wanted my armor plating to be substantial enough to withstand the laser blasts and asteroid hits that occur in the movies and started by making panels that were a full inch thick. I ultimately found that anything more than 3/4 of an inch felt too thick. For all intents and purposes, the thickness of my armor plating matches the set.
Before I go any further into the build though I'd like to talk a bit about my modeling process. For those who don't know much about polygon modeling, this video explains it in very basic terms. The problem with polygon edges is that they are mathematically perfect, which is to say more perfect than anything that exists in the real world. Even the edge of a knife has a radius that will catch light. The way to create these radii in cg is to simply add more polygons and/or subdivide the mesh at render time. When I started this build I knew the resulting model would have a very heavy polycount and could take a long time to render. Since my goal for this model is VR, which renders in real time, I knew I had to find a better way. Video games render in real time and get around the problem of heavy geometry by using textures (specifically normal maps) to make very light and optimized geometry look like it has the resolution of a denser mesh. Before deciding what to do I put together this test in maya using various techniques to achieve my desired panel look. The ultimate goal was a model that was light as it could be while still looking good.


I decided to make my geometry minimal and use the mental ray round corners shader to simulate the look of a radius on extremely light geometry. The renders I've been showing so far are from Keyshot, which has a similar effect, but here's a closeup of the effect in a maya/mental ray render (and a sneak preview!)

The other interesting thing this shader creates is a radius at geometry intersections. It almost makes it look to me like everything has a thick coat of paint on it, which is kind of what I want in this case. All this is a bump mapping trick, but I think from a certain distance it works extremely well. The plan is to bake the effect down to a texture map when I do the final paint job.
Anyway, enough technical nonsense!
While it's only been a week since my last post, modeling these panels took a lot of time and required a lot of reference. If you search for images of the Millennium Falcon you'll find endless variations of the Falcon's panel layout. The differences between the 5 foot and 3 foot filming miniatures is partially to blame. In this thread RPF user Jaitea has explored some of these differences.
While modeling my panels, I had fantastic reference of the top of the 5 foot filming miniature thanks to the photogrammetry work by RPF user vfxsup64 in this thread (these images were instrumental in figuring out the scale of some of the greebles later on).
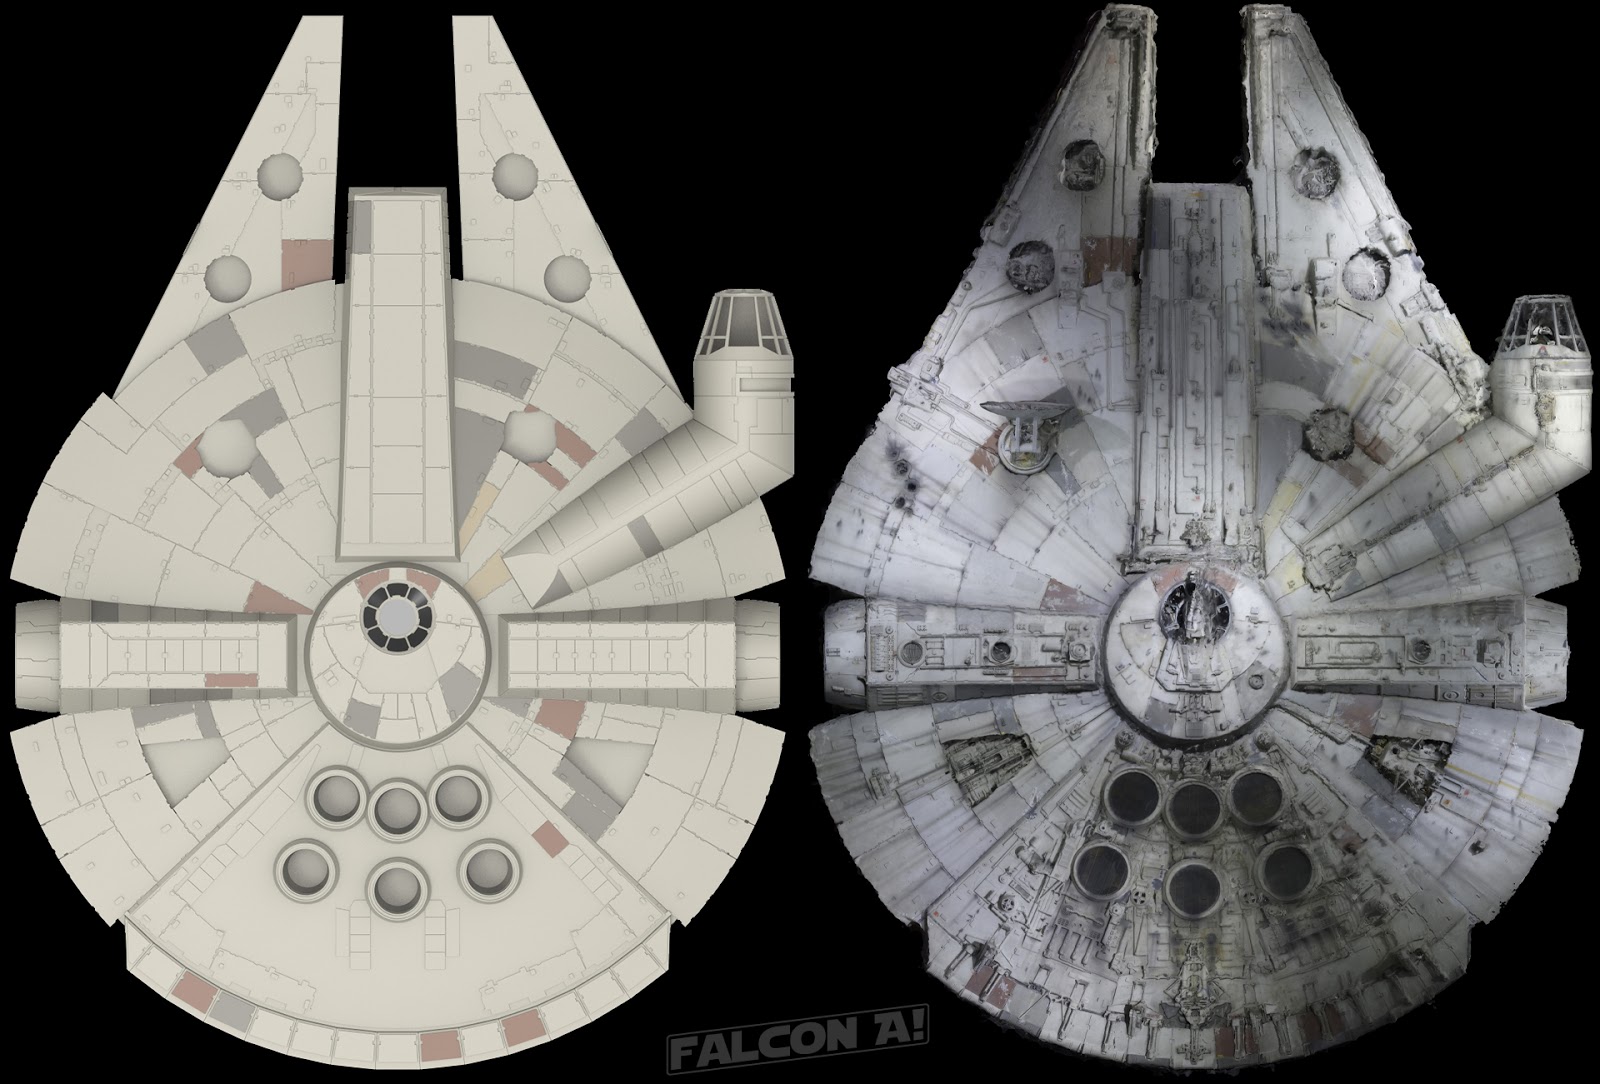
What I didn't have was good reference of the bottom. I did however have the blueprint drawing of the bottom panel layout of the set (half of it anyway).

Comparing that against my photo reference I found this panel layout and the 5 foot filming miniature for that side to be fairly close. The rest I simply eyeballed from photo reference. Since my model was already an idealized mishmash from several sources of reference I decided I couldn't be too precious about it matching exactly. Later when I uncovered better reference of the bottom I found that I was pretty close. (Bear in mind this bottom view predates the forward landing gear boxes which were added for The Empire Strikes Back.)

Something else I wanted to mention is that the Falcon's panels all have notched edges which I always thought added a nice level of complexity to the partlines. On the filming miniature a device called a nibbler was used to achieve this look. I used a similar workflow with booleans in maya. In addition to the large panels, the Falcon is covered with small patch panels I like to call chiclets. I included them with this post because the workflow and reference I used to make them is the same.
I hope you guys enjoyed and maybe learned something. As always, I welcome any questions or comments!
Next time: Landing Gear!
Once again, Awesome job on this! Any thoughts on the actual size of the Notches made on the Panels? Appears to be 2 different sizes of notches and appears that this is consistent through all the panels. Wondering of they used different nibblers or one nibbler.
ReplyDeleteHey Kevin! I had to phone a friend on this one. I asked my buddy Lee Malone (https://www.facebook.com/RogueStudioProductions/) and he said, "Those only came in one size to my knowledge. They were made for cutting computer cases/sheet metal. Lorne Peterson is responsible for finding them if I recall. The sizes do vary on the two different Falcons so not sure what they did on the Empire; the notches are only very slightly smaller. When I did my Empire Falcon I took my notching tool and cut the notcher off a little." Hope that answers your question!
DeleteBig help! Great information. Lee does amazing work! I really appreciate you taking the time and reaching out to him! So, one last question on this topic...the tool you link out to above. Is this a good one to use (do you recommend) for the 5ft Falcon Panels? is this What Lee Used ;') - -just want to make sure I get the "right" one. Thanks again for this awesome work you are sharing out.
ReplyDeleteI'm not sure which one Lee used but I will ask! So when people comment on here I get emails about it and someone else left a comment asking about the size of the notches but they must have deleted it! Anyway Lee told me the dimensions of the notches on his Falcon are 5.75mm x 2mm. I of course eyeballed the dimensions based on photo reference in Maya but this is definitely good information to have!
ReplyDeleteHi Jay, this is great information! I was “guessimating” on this size, and was a little off, so this really helps. The hunt is on for a good Notching Tool! If you are ever talking to Lee and you have the chance to ask what tool he used/would recommend, that would be awesome info too! ....have a lot of panels to make!
ReplyDeleteOnce again, thanks a lot for your help with this!